Saturday 31 August 2013

Saturday Savers binding - Izzy

Hi, 
It's my turn (Izzy) for Saturday Savers and I really had to put my thinking cap on for this one.... I had to choose a binding technique that was not showcased this week AND something to upcycle that could be bound.
Then I remembered those beer mats I have had for several years now and thought that they would make the perfect mini album. Team this with yummy products and we are good to go.

The sizes I am going to give you are based on the size of my beer mats, but you will had to adapt it to any beer mat you have
1/  I used Kaisercraft papers, 5 beer mats and grunge paper
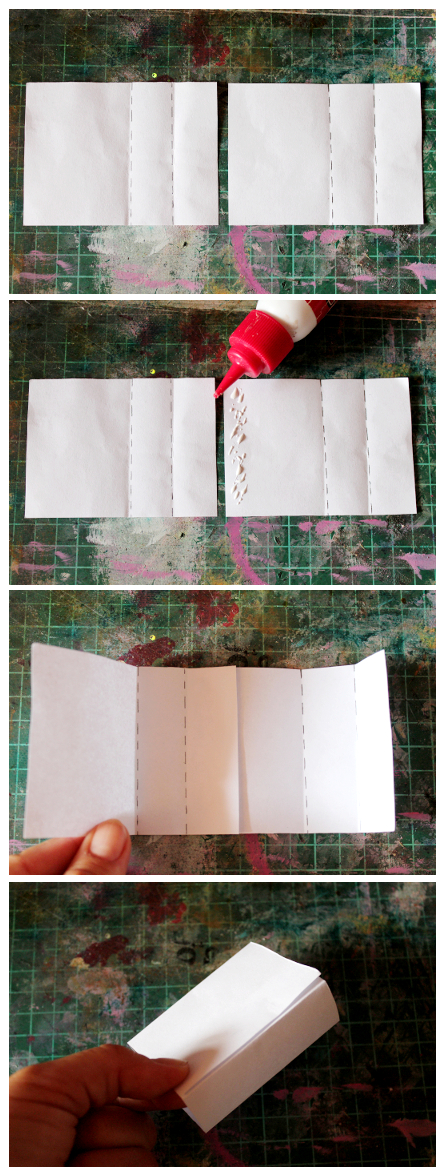
2/ I cut 4 pieces of white cardstock (I could have gone for any colour really) and I scored them
In this case, they are cut to 14 x 6.3 mm and scored to get 3/ 0.3 /3 cm
3/ I used a strong adhesive (double sided red tape) to adhere them to the beer mats as shown
4/ This is what you will get once it's glued. 
5/ I cut my papers to size (scored them in the middle too) and adhered them to your beer mat album
6/ Close up of the bound album
The front and back cover are left uncovered as they will be glued to the cover

TIP
If you want to make sure your album with hold, add some washi tape before gluing the papers
Peace of mind, better be safe than sorry


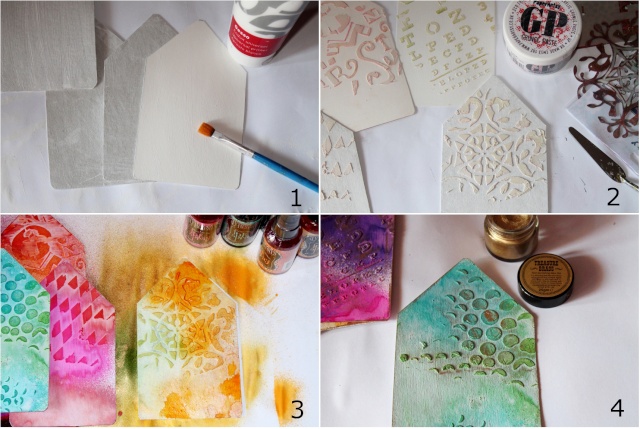
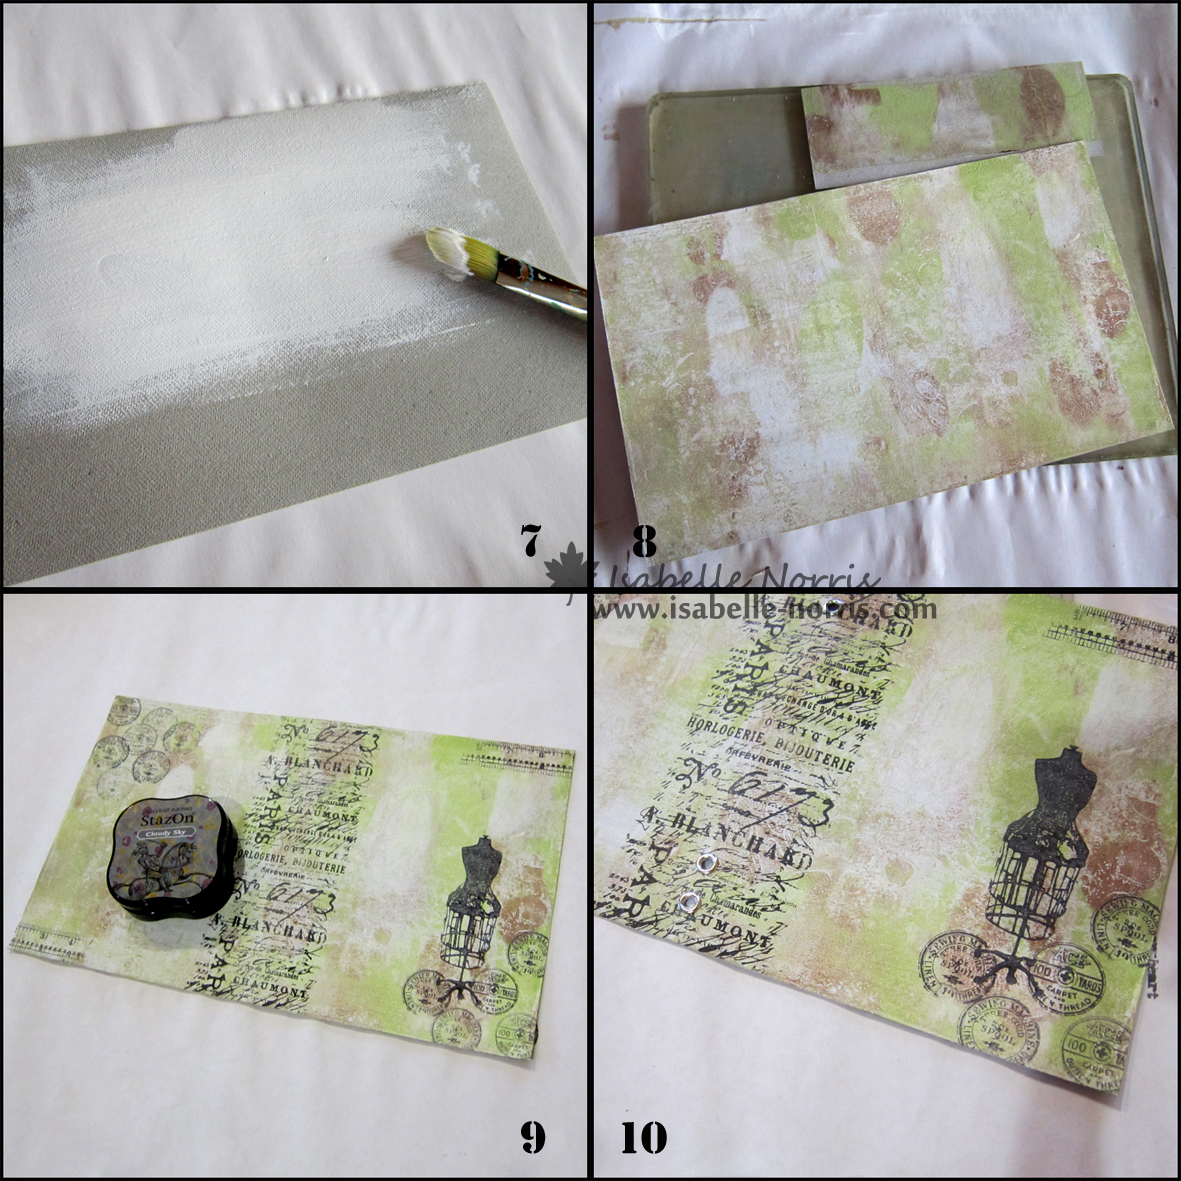
I then made the cover using Grunge Paper which has the advantage to be strong and easily altered (painted, stamps, punched etc). Probably my favourite for a mini album cover (or to make a passport cover as I had done here)
7/ Paint both sides of the cover with a layer of Gesso first and dry.  
8/ Use your Gelli Arts plate and a few masks/stencils along with PaperArtsy (or Americana) paints to make the cover. 
9/ Stamp using StazOn ink
10/ Punch two holes top and bottom and add eyelets for your ribbon 

This is what the inside cover looks like


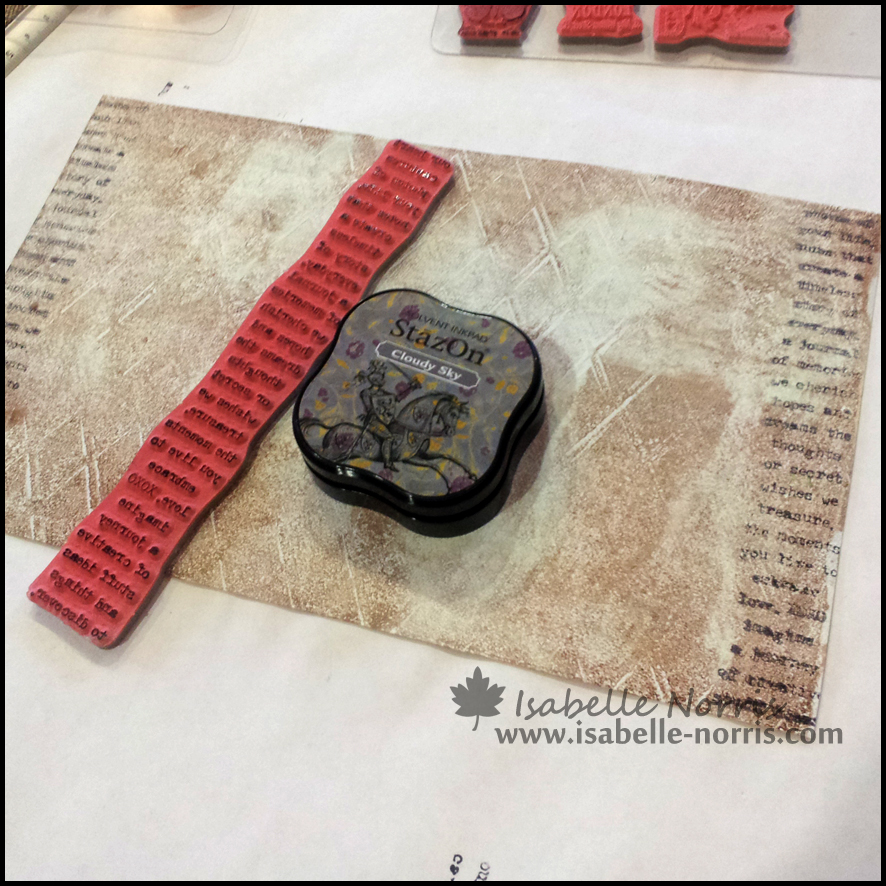
Stamp the cover using StazOn ink (I went over the dress form with a permanent black pen to make it stand out) and add a layer of your favourite varnish/sealer.
Glue the cover on the beer mat album
Make sure you add the ribbon BEFORE you glue the cover to the beer mats
much easier :)

Front

back

inside

Embellish the spine with a few buttons and a metal charm


I used
Beer mats
Stamps - Tim Holtz: Stuff to Say and Attic Treasures
PaperArtsy Fresco Finish paints: Snowflake, Chocolate, Guacamole, Honey Dew
Gelli Art plate: 8 x 10"
Tando Creative mask: Harlequin
Imagination Crafts stencil: Bay Leaf
StazOn midi: Cloudy Sky


See you tomorrow

Friday 30 August 2013

Binding week - Neil

Hi,
Here's Neil's tutorial as I promised earlier in the week. This is one of my favourite binding, so much fun to make. If you have not tried this yet, give it a go and come and link back to show us what you have done. We would love to see :)
How about using all those lovely GelliArt prints you have been collecting and make mini books out of them?


"Skewer Binding"

I don't know about you but I have loads of blank cards accumulated over the years; many many more than I need as I don't make as many cards as I used to. 
I find this binding is a good way of getting through them, and ending up with a book to boot is a bonus!
I've shown the process with undecorated cards so you can see clearly.

You'll need cards and bamboo skewers to start with.


Measure ad cut grooves into one of the cards as shown and then use this as a template. 

 Cut as many pages as you want. 

 Then the fun begins.... thread one skewer through a card; hit one miss one!

 Place another card next to that and then begin to skewer the second page in the same way. The difference this time is that you need to "pick up" the pieces that were missed from the first page as you go along.

 Repeat this process until you have enough pages for what you want to do.

 You will see that the last page has some loose tags....

 Just thread a skewer through these pages to neaten everything up

 Push the skewers through to create a neat line along the top, I tend to leave about a centimetre and a half. Tie a piece of ribbon to one skewer and begin to weave it around them all a few times and tie off.

 This keeps everything nice and neat and ensures the spine will be held in place. Trim the skewers on the bottom and repeat. Your basic book is complete and ready for decorating. You can of course decorate before you assemble too. One other thing I do is to glue the front and back cards. this makes for a stronger cover.

 So, you can have fun and add lots of colours and elements.


The possibilities are endless. 
You can use all your favourite scrapbook papers, anything really.

Products that can be used for this project:


Hope you liked this project. 
See you tomorrow. 


Thursday 29 August 2013

Binding week - Gio

Hi, 
Here's another different way to use book rings, which I must admit I had never seen before. It might be new to some of you too. 
Gio made a mini album and a rubber stamp holder. Love the gorgeous colours too. What about you? Let us know in a comment below


 For the mini album:
I cut grey cardstock to get some house shape and I gessoed them with the Pebeo Gesso. I used some different stencils, from the Crafters Workshop and Crafty Individuals and I spread some PaperArtsy Grunge Paste with a palette knife trough the stencils. When dry, I sprayed several colours of Dylusions ink sprays. I highlighted the raised areas with the Treasure Gold: Brass, using my fingers. I stamped every page with swirls, text and flowers from Hot Picks 1006 and Hot Picks 1206 using plates Ranger Archival Ink pad: Jet Black.
For the binding: I made some holes for the 25 mm rings, 2 cm one from another. I put the book rings trough the holes in vertical way, using two holes for every ring.


For the rubber stamp holder 
I cut two rectangles of heavy cardstock to size,  I gessoed them with the Pebeo Gesso. 
I folded them and I glued one to another on one side to create a folder. I reinforce the corners with some washi tape. 
I used some different stencils, from the Crafters Workshop and Crafty Individuals and I spread some PaperArtsy Grunge Paste with a palette knife trough the stencils. When dry I sprayed several colours of Dylusions ink sprays. I highlighted the raised areas with the Treasure Gold: Brass, using my fingers. I stamped them with swirls, text and flowers from Hot Picks 1006 and Hot Picks 1206 plates using Ranger Archival Ink pad: Jet Black.  For the binding: I made two holes at the time, for the 50 mm rings: 4,5 cm one from another. I put the book rings trough the holes in horizontal way, using two holes for every ring.

Here's a little step by step template Gio made to show you how she created the folder.


The Crafters Workshop template - Circle explosion 
The Crafters Workshop template - Eye chart , Harlequin , Mixed-up alpha 
Crafty Individuals mask: Magic roundabout 
PaperArtsy Hot Picks rubber stamps: 1006 and 1206
Ranger Archival Ink pad: Jet Black 
Pebeo Studio acrylic auxiliaries: Gesso 250 ml  
Treasure Gold: Brass 
Washi style paper tape: Barcode  

See you tomorrow


Wednesday 28 August 2013

Binding week - Sylvie

Hi, 
Here's a first approach of binding a mini album with a book ring with Sylvie who made a lovely album with the Gelli Art plate and PaperArtsy paints and stamps. 
Here's some of the pictures, but there will be more on her blog


Use several white cardstocks to make different backgrounds. 
Use the Gelli Art plate, a brayer and a selection of paints (here Fresco Finish) 

Choose different masks to add patterns to your background. 
Try to layer them for different looks

I then cut 8 circles in cardboard and 16 circles from the GelliArt backgrounds I had made. 
Glue the backgrounds on the cardboard and punch a circle in each of them to add the ring later

Use masks and Grunge Paste to add texture. 
Once dry, use Distress inks to add touches of colour

On the other side, I stamped the PaperArtsy JOFY images with black Archival ink and painted them with Fresco Finish paints. 
I then covered them with a layer of Fresco Finish Metallic Glaze. 
I bound the circles with the ring to make a mini album and added ribbons. 
You can then add your favourite pictures and this will make a perfect little gift

I used :
PaperArtsy Fresco finish paints (Guacamole, Mermaid, Lilac, Snowflake, Sherbet, Claret, Hey Pesto, Autumn Fire,South Pacific, Zesty Zing)
PaperArtsy Jolly collection: stamps 10-11-12
Imagination Crafts stencils: Bay Leaf 
The Crafters Workshop templates: Cornflowers, Harlequin
Artemio Ribbons: Flowers, street, girl
Tando Masks: Distorted hive
Andy Skinner designs Masks: 12x3 burning
PaperArtsy Fresco Finish paints: Metallic glaze
Archival ink pads: Jet Black

See you tomorrow


Tuesday 27 August 2013

Binding week - Karen

Hi, 
Karen is with us today with a little book and a step by step for Side Binding. This is a simple yet very effective technique. 

I have chosen to use a SIDE BINDING for my book.  
This is very simple and you can create some wonderful effects with different threads and beads.  
But I have just used thin ribbon so that you can see how it all looks.  
You can make this book any size but its not recommended that you make it too thick as its harder to make the holes.  
For my covers I cut 2 pieces of cardboard 13x9cm (from an old cereal packet) and cut 2.5cm off one end and 2mm off the other end of the same piece.  
This will give you a 'hinge'.  
To cover these pieces glue down onto paper (I used copier paper that I sprayed with Dylusions in Melted Chocolate, Rose Quartz and Vibrant Turquoise), placing the cut pieces as shown with a 2mm gap.

Cut your pages 13cmx8cm.  I used plain paper for this and also cut two to line the inside of the covers.  Now place your pages over the back making sure that the edges to be bound are all level and place the top cover over.  Hold together with clips.  


  Cut out, leaving a margin that you tuck over and glue to the other side.  The cover with two sections is the front.

Now make the holes for the binding.  I made three holes for my size book but you can make a many as you like, the principle is the same.  Bear in mind that you will need to be able to get your chosen binding thread through the holes three times.   

 Starting from the back bring your thread up through the top hole (leave a longish end for tying) , pass it over the top of your book and then up through the same hole.  Then take it around the edge and up the same hole again. 


 Now take your thread down through the second hole, around the edge and down through the second hole again.  
Take the thread around the edge and up through the second hole again.  
Repeat as many times has necessary depending on the number of holes you have on your book.


Bring the thread from the back 
1/up through the last hole, 
2/around the bottom, 
3/up through the same hole.   

 Then take thread down through the second hole and tie at the back.


To finish my book off I clear embossed a Script Stamp from my stash and added a paper tab with a painted Tando Creative Flower on top and used a magnet for closure.  
Treasure Silver was rubbed over the clear embossing and around the edges too.
Karen used
Dylusions Ink Sprays - Melted Chocolate, Rose Quartz and Vibrant turquoise
Treasure Gold - Silver
Basic Grey Magnetic Discs - Small

See you tomorrow

Monday 26 August 2013

Binding week - Jane

Hello, 
This week we are going to show you different binding techniques... from the simple book ring (Wait until you see Gio's sample.. ... she is revisiting book rings and has surprised everyone with the way she used them.) to more challenging (but oh so gorgeous) ways during the week. 
Neil will have a complete beauuuutiful step by step project later in the week too... 
So stay tuned, it's gonna be goood :)
Let's start with Jane today who used the Tando Creative mini album along with GELATOS to make the perfect note book.


I have used a Bind-it-All to make a note book......


I used Tando Scalloped Mini Book, only two of the six, so plenty more for extra books.  Coloured with Gelatos, yay, first play with them.....

I used the Bind-it-All to make the holes in the 2 outsides and sheets of paper for inside.


Finish with a little bling and some ribbons.

Materials used
Bind-it-All Wire - Antique Silver 3/4"
Gelatos - Silver Ice, Bubble Gum, Metallic Mint, Metallic Blueberry, Metallic Grape, Lavender
Gelatos Tool Set
Memory Box - Classic Upper Alphabet Set
Crafters Workshop Mask - Cell Theory
Copy paper

See you tomorrow