Saturday 31 March 2012

Simply Saturday with grungy paint effect

Hi, 
What a surprise when I saw this beautiful sample Gay made. Not at all her usual style, but I'm sure you will agree that she is very good at grungy stuff too. 
A lovely box to offer to a man in your life. 
Here's how Gay used the paint on this sample.


The first coat of paint was Snowflake, I did that to see the shape more clearly, shiny metal can be distracting :0) 
I painted with Cinnamon and then the crackle glaze, allowed to dry and then a coat of Black. I used the harlequin template and painted through it to get the lighter paint effect with the two greens. I added a very light spray of cosmic shimmer in Golden mint just to give the lighter areas a bit of zing. Finally stamped and embossed the Telegraph text and knocked that back by sanding. Making anything for men, for me, is a big challenge but I actually enjoyed getting all painty with this one!


I used  
Snowflake, Little black dress, Cinnamon, Toad Hall and Guacamole,
I also used the Fresco finish Crackle glaze
embossed with Frantage aged gold embossing powder.
Crafters workshop template Harlequin
Cosmic shimmer mist Golden mint.


Friday 30 March 2012

Paint effect week: Bean Playing!

By Linda Elbourne

I cannot begin to tell you how excited I was when Wendy Vecchi's Studio 490 stamps landed at The Craft Barn. For my metal effect this week I have used Viva Precious Metal Paints on both Gloss Cardstock and Metal. The basic jacket of the tin is indeed Gloss card painted with Viva Precious Metal in Lime; I embossed it first using an embossing folder and then applied the paint with a piece of Cut and Dry foam before I placed it in the Bind-It-All. This was then wrapped around the tin and laced using waxed cotton finished off with a few beads. The flowers are made using Wendy Vecchi stamps and scraps of metal. The flower centres and Butterflies were painted in Viva Precious Metal in Turquoise ... this paint offers great metallic coverage on almost any surface ... I LOVE it! Now I have the perfect place to store my Craft Sticks.


Linda used: 
White Gloss Cardstock
Embossing Folders: Birds and Swirls; Script

See you tomorrow

Wednesday 28 March 2012

Paint effect week: Canvas

Hi, 
This is your treat of the week me think... Michelle has used lots of different paint effects and texture on one yummy project for you to try. Can't wait to read what you think... 

I've tried to use a variety of different paint effects on each of the mini canvases as well as use a few different products to make a texture sampler.


Top Left Canvas - This little canvas is simply coloured with acrylic paint, then sprayed with a web spray and the sentiment applied on tissue paper with multi matte medium.


Top Centre - For this canvas I painted the canvas first with acrylic paint and then mixed sand and Gesso to make a texture paste. After applying the paste to the canvas I just ran the brush handle through to give further texture. Bundled sage distress inks were then applied very sparingly to the edges of the dry gesso.


Top Right - This canvas was first painted with acrylic paint then gesso was spread over a mask and left to dry.


Middle Left - The texture on this canvas was made by adding inclusions. Beads and other bits were stuck to the canvas then strips of tissue were applied over the beads and stuck on with multi medium. Then dry Distress inks were just brushed on and the tops of the beads were rubbed with a baby wipe to remove the ink.


Middle Centre - This canvas was painted then coated with dreamweaver crackle paste which was left to dry. When it was dry I painted it with acrylic paint and stuck the stamped tissue dragonfly down with multi mediumI then heated the paint with a heat gun intil it blistered around the image.


Middle Right - This canvas was simply painted and then the tissue image was adhered with multi medium.


Bottom Left - This too was painted and then the birds were stenciled on using acrylic paint and the dreamweaver stencil.


Bottom Left 2 - For this little canvas I painted it with acylic paint then coated it with Ferro Paste. I sprayed a stamp with water then pressed it into the paste and left it to dry. I sponged acrylic paint around the edge of the paste and decorated with micro beads and gems.


Bottom Centre - This canvas was painted then spread with gesso which had crushed eggshell in it.


Bottom Right - Simply painted and microbeads stuck on with glossy accents. The butterfly was stamped onto tissue and adhered with multi medium


I used

PaperArtsy Fresco Finish paints: Hey pesto, Mushroom
Claudine Hellmuth Studio - Mini matte medium
Versafine ink pad - black
White tissue paper pack: 10 sheets
Katzelkraft rubber stamps - Papillons 04
CI-259- Four tree stamps


Paint effect week: notebook

Hello, 
Today's gorgeous sample was made by Neil, who has been using the Americana acrylic paints to alter a book cover.
Love the colours on this. What do you think?

I started by brushing paint over the front and back covers using Americana in avocado, deep midnight blue and fawn in blocks of colour. It doesn't really matter how it looks as long as it's covered.
Then I chose a mask and using a piece of foam I started adding paint, I started with the light colour, applied the paint sparingly and then moving the mask slightly add a second colour.
Take a second mask and add the last colour in the areas you haven't done with the first mask.
To make the embellishment I took a small chipboard circle from Tando and covered it with Inka gold before adding versamark and UTEE and heating it. While it was still wet, I pressed the Tando compass into it. I coloured the compass with peeled paint Distress Stain and stamped the compass design onto it before adding Versamark and UTEE to it and heating it.


To finish I rubbed Inka gold around the edges of the book and spine and adhered the compass with multi medium.
Materials
Americana acrylic paints - avocado, fawn and deep midnight blue
Inka gold - Lava green
Crafters Workshop masks - Flowers and harlequin
Tim Holtz stamps: Air travel
Distress Stain - peeled paint


Tuesday 27 March 2012

Paint effect week: mobile phone holder


Hello bloggers,
Ready to tame your sewing machine, because it's Gio's day and it usually means fabric and stitching. This is probably one of the reasons why I admire her work so much (I can't tame *my* sewing machine).
Today, she uses the paint on canvas (the sticky type) with a brayer not only to make the background, but to transfer images too.
I will let her explain how she made those stunning samples.. 


 I put some drops of Fresco Paint London bus,Metallic glaze, Haystack on an plexiglas sheet ( you can use the craftmat as well). I 'splat' the canvas sheet on the plexiglas, moving it slightly, then I roll over the brayer on the plexiglass and then on the canvas, until I get the desired look. 
Let dry if you want to add more colours between layers. When the background was dry I used a piece of sequin waste and some Distress ink to cover the white parts of the canvas.

To transfer the image, I put enough Fresco Paints Snowflake on the canvas, I spread it with the paintbrush and then I put the image face down. I rub with the fingers or with the brayer the image to smooth wrinkles and air-bubbles. After a couple of minutes you can gently peel-off the back of the image, or you can wait until is dry and then use water and the finger to remove the back of the image. To finish the transferred image I put some drops of Claudine Hellmuth Glossy medium on it. I added some stamped details using Archival ink Plum and Impression Obsession Swirl stamp and a script stamp from Paperartsy HP1006.

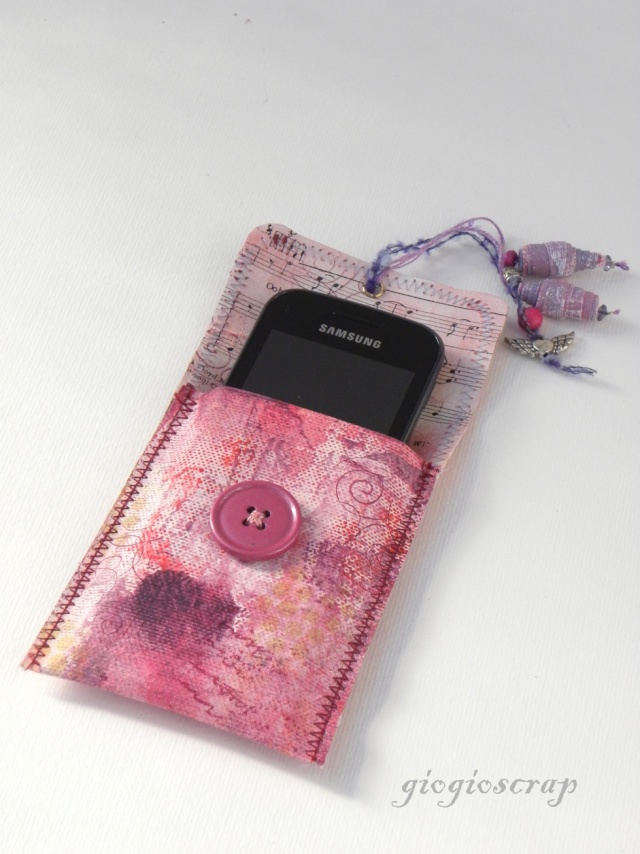
To make the pochettes I just folded in three parts the sheet of canvas on reverse and I sewed it along the borders; I drew a small triangle on the corner, then I opened up the pochette and I flattened it on the mat: I sewed a little triangle (see pictures) . I turned the pochette on the right side and I added sewed details. For the lock I made a button from Viva Pardo clay and I stamped with Obsession Swirl stamp. I added another small button and some fibres along with canvas beads.


For the mobile-phone holder I cut a long strip of canvas, I folded in three parts and I sewed it along the borders on the right side of the canvas . I hand sewed a button, put an eyelet and add some fibres.

With the leftovers of canvas I cut two tags, I transferred an image and I added sewn details along with some fibres and canvas beads. I stamped the sentiment using Stampers Anonymous - Tim Holtz: Just thoughts and Archival ink Plum and Jet Black StazOn 

Clever tip of the day
To make the canvas beads, I cut a painted Sticky back canvas in long triangular strips. I just rolled them using the sticky side instead of glue.


Fresco Paint London bus, Metallic glaze, Haystack, Ice blue, Snowflake
Distress Inks Broken China, Mustard seed , Barn Door
Impression Obsession Cover a card -Swirl 
Viva Pardo jewellery clay: lavender jade - Coral
Stampers Anonymous - Tim Holtz: Just thoughts


Monday 26 March 2012

Paint effect week: tag art

Hi, 
This week we are going to talk about the different effects you can get with paints. 
Paints have become increasingly popular and we thought that a week about paints might be interesting for those who are just starting to use them... and maybe for the more advanced crafters out there... 


So we start off with Isa'sArt and a gorgeous distressed tag. Easy technique but SO effective. Hope you like it ;)


I started with a layer of gesso (this is to protect my tag and it also give a nice texture), then I added a bit of paint (turquoise and red: such a wonderful vintage combination!), and finally, a few ink stains
I finished it off by sanding and adding a bit of brown ink...  et voilà :)


Tim Holtz Alterations: Movers & Shapers large die - Tag & book plates + gears
Oxford Impressions stamp: Steampunk works 
Crafty Individuals stamp- CI 305
Black Versafine ink
Distress inks black and walnut, 
Americana paint: Indian turquoise, Deep burgundy
Aquamarker pen Sepia, black
Rub-ons silver and red Set 1 (white)


Saturday 24 March 2012

Simply Saturday: bird elegance

Hi, 
Last day for our bird week with Gay and her beautiful clean and simple style. This, to me, is such an elegant card, I love it! How about you?

The birds were stamped in black and coloured with Copic markers, cut out and shaped for dimension. The flower weed was stamped in the moonlight ink and dusted with Cosmic Shimmer mica powder, it really glistens in the sunlight. I applied the birds with glue gel so that they were raised up off the card.

PaperArtsy Hot Picks HP 1005 EZ
Katzelkraft Birds Full A4 plate
Brilliance Moonlight white ink pad
Cosmic shimmer iridescent sparkle mica powder.
Glue gel. ( Pinflair)


See you next week


Friday 23 March 2012

Bird week: Art Journal pages

Hi, 
A lovely Art Journal page made by Michelle today. I have those bird stamps by Crafty Individuals but would never have thought of using them like this. How clever! What do you think?


The background was splodged on with TH Distress Inks then stencilled over with a brush and TH Ink Pad to give the flower effect. I then stamped the bird plates onto tissue paper with versafine heat set them and then cut out the panels which I aranged around the page. They were then adhered with Multi Matte medium.

The inspirational quote was printed onto the smooth side of tissue by sticking tissue to an acetate sheet with re positional glue, after being pressed onto the carpet a few times to reduce the stickiness. It went through the printer without any problems. 

To prevent the text bleeding when it was stuck dowm I pasted the back of the tissue then stuck it down and dried with the heat gun. 


Distress Stains: Bundle sage, Mustard seed, Spiced marmalade
Distress Ink pad pine needles
Claudine Hellmuth Studio - Mini matte medium
CI-266- birdy squares
CI-265 - 3 birds and flowers


Thursday 22 March 2012

Bird week: textured canvas

hi, 
Time for a canvas... in lovely blue shades made by the talented Linda
Linda used paint, metal, micro beads, sticky back canvas: a lot of texture going on here... 


I had fun playing with the Eco Green Acrylic Paint and Gesso to make my bird canvas this week ... but before I touched any paint I added lots of texture to the canvas! A strip of old book page ... a piece of Claudine Hellmuth's Sticky Backed Canvas pleated; some Gesso through a Sequin Waste Stencil ... and then I started painting!


When I was happyish with the background I added some stamping in PaperArtsy Snowflake paint with the flourish from HP1005. Tim's Caged Bird was die cut from Ten Second Studio metal backed onto black cardstock with Humungo Tape and then embossed using a folder. The book page flowers are die cut with the Tattered Florals die.


I gave the impression of flower stems with black paint and the edge of a credit card. I think collage elements always look better if they are grounded. 
Ingredients:-
Eco Green Acrylic Paint: Ocean; Lake; Blue Patina; Black.
Gesso
PaperArtsy Hot Picks: HP1005
PaperArtsy Paint: Snowflake
Tim Dies: tattered Florals; Caged Bird
TSS Metal in Copper
Claudine Hellmuth Sticky Backed Canvas
Sequin Waste Stencil


Hope you liked this, 
See you tomorrow


Wednesday 21 March 2012

Bird week: time for a tag.. and a video :)

Hi,
Isa'sArt is with us today with a video (did I says spoiled yesterday?) to show you a distressing technique that looks truly amazing. And it's easy too, yet very effective. What more can you ask?
So here's your steampunk bird of the day and all the details about it!


For the distressed effect, I used Distress ink and an aquamarker pen


As for the "Distressed wire", it all started with plastic Aida. 

Et voilà


I'm sure you will enjoy this video and technique, I know I did. 
Don't forget to let us know in a comment below.... 


Tim Holtz Alterations die: Movers & Shapers large die - Tag & bookplates
Stamp Crafty Individuals 329
Oxford Impressions Steampunk elements, Steampunk works
Versafine and Distress inks (pads et stains), Versamark, Brilliance
Americana paint white
Aquamarker pen Sepia
Ranger white pen
Cosmic Shimmer embossing powder, 
Distress embossing powders
brads, gems


Tuesday 20 March 2012

Bird week: how about a caged book?

Hello, 
Day two for our bird week and another step by step for you (aren't you spoiled?) with Neil and his lovely (and very clever) little Caged Bird project. 


A little bird told me........ we are all familiar with that saying I'm sure. Now it's my turn to "tell the bird" in this little journal!
I started out by cutting a pile of pages out of lightweight card and two more out of a thicker card to create the covers using the top bird (the one with no legs!)


Use a Crop-A-Dile to punch a hole through the tail of all the pages and covers. Set the pages to one side and colour the covers with distress ink and then stamp images from the stamps onto the covers using the same distress ink colours


Do both sides and then cover the outer front and back cover with a watermark pad and UTEE - remember to flip the bird for the back otherwise you will UTEE the wrong side!.

When it's cool then use a small book ring to make your book. Add small black gems to create the eyes and put to one side.

Take the bird cage and a medium circle from Tando's grab bag and lightly press the bird cage onto it; this will give you the indentations of the 4 legs. Using the smallest punch on the Crop-o-dile punch holes using the indents as a guide.
Colour the base with distress ink and stamp your images using the same colours and edge the circle with Inka gold.


Press the base onto the birdcage lining up the holes, They should be a tight enough fit but you can add a dot of glue to secure. Tie some co-ordinating ribbon to the cage to form a hanging loop and also to the book ring of the journal.
Then you should end up with this.


A place for you to "tell the bird" all your little thoughts.....
Materials 

Sizzix bird die
White card
Distress ink - Peeled paint and Walnut stain
Katzelkraft Fleurs grunge stamps KTZ48.01
Artemio bird cage
Tando Grab bag circles
Versamark clear pad and UTEE
Heat Gun
Crop-o-dile
Small black gems
Inka gold - lava green
Small book ring 
Ribbons